Excel macros for SAP GUI - the secret method
Introduction
In this guide, you'll learn how to connect an Excel spreadsheet to SAP GUI using macros. No need to be a developer - this tutorial is designed for beginners.
Section 1: Enable macros in Excel
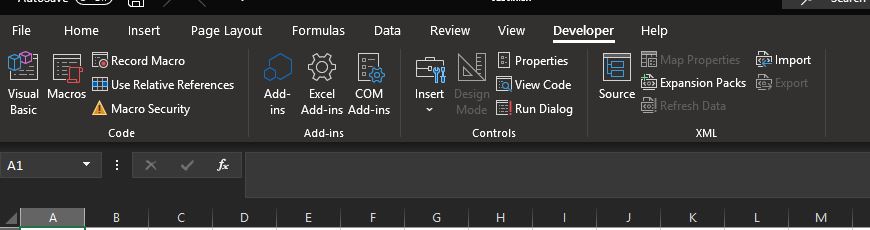
First, you need to enable the Developer tab in Excel:
- Create a new Excel workbook
- Go to File, then Options
- Select "Customize Ribbon"
- Check the "Developer" checkbox in the right section
- Click OK
Section 2: Grant SAP GUI access in Excel
Now, activate the SAP GUI Scripting API reference:
- Click the Developer tab, then "Visual Basic"
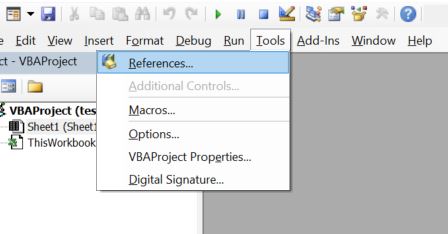
- Go to Tools, then References
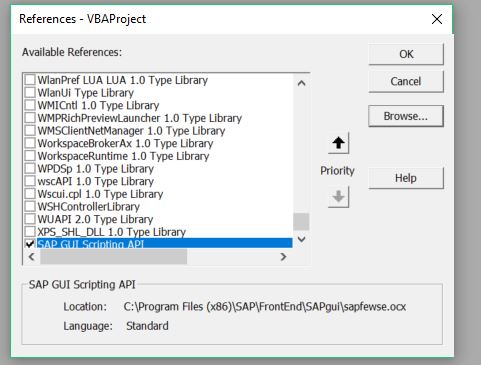
- Click Browse and enter the path:
C:\Program Files (x86)\SAP\FrontEnd\SAPgui\sapfewse.ocx - Click Open
- Verify that "SAP GUI Scripting API" is checked and click OK
Section 3: Excel macro analysis
The Excel file containing the complete code with detailed explanations is available for download on the resources page. All code lines are commented to facilitate understanding.
Section 4: Test the Excel macro connected to SAP GUI
To test your macro:
- Insert a shape in Excel (Insert, Illustrations, Shapes)
- Right-click the shape and assign the macro
- Click the button to launch execution
Important: Save your file as .xlsm format (macro-enabled workbook), not .xlsx. If you save as .xlsx, your macros will be deleted.
Conclusion
You now know how to connect Excel to SAP GUI with VBA macros. To go further and learn how to extract SAP data, automate imports/exports, and chain multiple macros, check out our complete training.


